
정보를 보호하는 대학생
<안드로이드 스터디 07> 비만도 계산기 - getPreferences(), 액티비티, 인텐트 본문
1. 메인 액티비티와 결과 액티비티를 생성한다.
2. AndroidManifest에 들어가서 수정을 해준다.
<activity android:name=".ResultActivity"
    android:parentActivityName=".MainActivity"></activity>
이 부분을 찾아서 위와 같이 수정해준다.
이 result액티비티의 부모액티비티가 main액티비티임을 명시하는 것이다.
수정하면 전체 모습은 아래와 같이 된다.
<?xml version="1.0" encoding="utf-8"?>
<manifest xmlns:android="http://schemas.android.com/apk/res/android"
    package="com.android.aconst">

    <application
        android:allowBackup="true"
        android:icon="@mipmap/ic_launcher"
        android:label="@string/app_name"
        android:roundIcon="@mipmap/ic_launcher_round"
        android:supportsRtl="true"
        android:theme="@style/Theme.Const">
        <activity android:name=".ResultActivity"
            android:parentActivityName=".MainActivity"></activity>
        <activity android:name=".MainActivity">
            <intent-filter>
                <action android:name="android.intent.action.MAIN" />

                <category android:name="android.intent.category.LAUNCHER" />
            </intent-filter>
        </activity>
    </application>

</manifest>
3. MainActivity xml 코드
<?xml version="1.0" encoding="utf-8"?>
<androidx.constraintlayout.widget.ConstraintLayout xmlns:android="http://schemas.android.com/apk/res/android"
    xmlns:app="http://schemas.android.com/apk/res-auto"
    xmlns:tools="http://schemas.android.com/tools"
    android:layout_width="match_parent"
    android:layout_height="match_parent"
    tools:context=".MainActivity">

    <EditText
        android:id="@+id/heightEditText"
        android:layout_width="0dp"
        android:layout_height="wrap_content"
        android:layout_marginStart="16dp"
        android:layout_marginTop="76dp"
        android:layout_marginEnd="16dp"
        android:ems="10"
        android:hint="키"
        android:inputType="number"
        app:layout_constraintEnd_toEndOf="parent"
        app:layout_constraintHorizontal_bias="0.0"
        app:layout_constraintStart_toStartOf="parent"
        app:layout_constraintTop_toTopOf="parent" />

    <EditText
        android:id="@+id/nameEditText"
        android:layout_width="0dp"
        android:layout_height="wrap_content"
        android:layout_marginStart="16dp"
        android:layout_marginTop="16dp"
        android:layout_marginEnd="16dp"
        android:ems="10"
        android:hint="이름"
        android:inputType="text"
        app:layout_constraintEnd_toEndOf="parent"
        app:layout_constraintHorizontal_bias="0.0"
        app:layout_constraintStart_toStartOf="parent"
        app:layout_constraintTop_toTopOf="parent" />

    <Button
        android:id="@+id/resultButton"
        android:layout_width="wrap_content"
        android:layout_height="wrap_content"
        android:layout_marginTop="8dp"
        android:layout_marginEnd="32dp"
        android:text="결과"
        app:layout_constraintEnd_toEndOf="parent"
        app:layout_constraintTop_toBottomOf="@+id/weightEditText" />

    <EditText
        android:id="@+id/weightEditText"
        android:layout_width="0dp"
        android:layout_height="wrap_content"
        android:layout_marginStart="16dp"
        android:layout_marginTop="16dp"
        android:layout_marginEnd="16dp"
        android:ems="10"
        android:hint="몸무게"
        android:inputType="number"
        app:layout_constraintEnd_toEndOf="parent"
        app:layout_constraintHorizontal_bias="0.0"
        app:layout_constraintStart_toStartOf="parent"
        app:layout_constraintTop_toBottomOf="@+id/heightEditText" />

</androidx.constraintlayout.widget.ConstraintLayout>
4. MainActivity 코틀린 코드
package com.android.aconst

import android.content.Intent
import androidx.appcompat.app.AppCompatActivity
import android.os.Bundle
import android.widget.Button
import android.widget.EditText

class MainActivity : AppCompatActivity() {
/////////////////////변수 선언////////////////////////
    lateinit var resultButton : Button
    lateinit var heightEditText: EditText
    lateinit var weightEditText: EditText
    lateinit var nameEditText : EditText

/////////////////////////////////////////////////////

    override fun onCreate(savedInstanceState: Bundle?) {
        super.onCreate(savedInstanceState)
        setContentView(R.layout.activity_main)
        resultButton = findViewById<Button>(R.id.resultButton)
        heightEditText = findViewById(R.id.heightEditText)
        weightEditText = findViewById(R.id.weightEditText)
        nameEditText = findViewById(R.id.nameEditText)

        loadData()


        resultButton.setOnClickListener{

            saveData(heightEditText.text.toString().toInt(),
                weightEditText.text.toString().toInt(),
            nameEditText.text.toString())
            //버튼 누르자 마자 키, 몸무게 값을 저장함

            var intent = Intent(this, ResultActivity::class.java)
            intent.putExtra("height", heightEditText.text.toString()) // key : height, 값 : 키 입력한 것
            intent.putExtra("weight", weightEditText.text.toString())
            intent.putExtra("name", nameEditText.text.toString())
            startActivity(intent)
            //인텐트를 결과 액티비티에 보내겠다.


        }


    }
    ///////////////////////데이터를 저장하는 함수////////////////////////
   private fun saveData(height:Int, weight:Int, name:String) {
        var pref = this.getPreferences(0)     //getPreferences()는 공유환경설정 파일을 제공함
        var editor = pref.edit()

        editor.putInt("KEY_HEIGHT", heightEditText.text.toString().toInt())
            .apply()     //putInt : 데이터를 넣음
        editor.putInt("KEY_WEIGHT", weightEditText.text.toString().toInt()).apply()
        editor.putString("KEY_NAME", nameEditText.text.toString()).apply()


        ///////////////////////////////////////////////////////////////

    }
    //////////////////////////데이터를 불러오는 함수//////////////////////////
    private fun loadData(){
        var pref = this.getPreferences(0)
        var height = pref.getInt("KEY_HEIGHT", 0)    // 값이 없으면 0으로 세팅
        var weight = pref.getInt("KEY_WEIGHT", 0)
        var name = pref.getString("KEY_NAME", "none" )


        if(height !=0 && weight !=0 && name !="none") {   //한번 이상 겟프리퍼렌스가 실행 된 경우
            heightEditText.setText((height.toString()))  //키 부분에 텍스트 설정해라. 바로 위의 변수 height에서 가져오는 것임
            weightEditText.setText((weight.toString()))
            nameEditText.setText((name))

        }


   }
}
5. ResultActivity xml 코드
<?xml version="1.0" encoding="utf-8"?>
<androidx.constraintlayout.widget.ConstraintLayout xmlns:android="http://schemas.android.com/apk/res/android"
    xmlns:app="http://schemas.android.com/apk/res-auto"
    xmlns:tools="http://schemas.android.com/tools"
    android:layout_width="match_parent"
    android:layout_height="match_parent"
    tools:context=".ResultActivity">

    <TextView
        android:id="@+id/textView"
        android:layout_width="wrap_content"
        android:layout_height="wrap_content"
        android:layout_marginStart="16dp"
        android:layout_marginTop="130dp"
        android:layout_marginEnd="16dp"
        android:text="결과가 표시되는 곳"
        android:textAppearance="@style/TextAppearance.AppCompat.Large"
        app:layout_constraintEnd_toEndOf="parent"
        app:layout_constraintStart_toStartOf="parent"
        app:layout_constraintTop_toTopOf="parent" />

    <ImageView
        android:id="@+id/imageView"
        android:layout_width="100dp"
        android:layout_height="100dp"
        android:layout_marginStart="150dp"
        android:layout_marginTop="74dp"
        android:layout_marginEnd="150dp"
        android:layout_marginBottom="270dp"
        android:tint="@color/teal_700"
        app:layout_constraintBottom_toBottomOf="parent"
        app:layout_constraintEnd_toEndOf="parent"
        app:layout_constraintStart_toStartOf="parent"
        app:layout_constraintTop_toBottomOf="@+id/textView"
        app:srcCompat="@drawable/ic_baseline_mood_24" />
</androidx.constraintlayout.widget.ConstraintLayout>
6. ResultActivity 코틀린 코드
package com.android.aconst

import androidx.appcompat.app.AppCompatActivity
import android.os.Bundle
import android.widget.ImageView
import android.widget.TextView
import android.widget.Toast

class ResultActivity : AppCompatActivity() {

    lateinit var resultTextView: TextView
    lateinit var imageView: ImageView

    override fun onCreate(savedInstanceState: Bundle?) {
        super.onCreate(savedInstanceState)
        setContentView(R.layout.activity_result)

        resultTextView = findViewById(R.id.textView)
        imageView = findViewById(R.id.imageView)

        var height = intent.getStringExtra("height")!!.toInt()
        var weight = intent.getStringExtra("weight")!!.toInt()
        var name = intent.getStringExtra("name")!!.toString()
        var bmi = weight / Math.pow(height/100.0, 2.0)   //비만도 계산 공식


        ////////////////////////입력한 키 체중에 따라 bmi 계산하고, 텍스트 출력 /////////////////////
        when {
            bmi >= 35 -> resultTextView.text = "고도비만"    //bmi가 35이상이면 결과 텍스트에 고도비만이라고 출력
            bmi >= 30 ->resultTextView.text = "2단계 비만"
            bmi >= 25 ->resultTextView.text = "1단계 비만"
            bmi >= 23 -> resultTextView.text ="과체중"
            bmi >= 18.5 -> resultTextView.text ="정상"
            else -> resultTextView.text = "저체중"

        }
        ///////////////////////////////////////////////////////////////////////////////////////////


        ///////////////////////////////////결과에 따라 이미지 다르게 출력////////////////////////

        when{
            bmi >=23 ->
                imageView.setImageResource(R.drawable.ic_baseline_sentiment_very_dissatisfied_24)

            bmi >18.5 ->
                imageView.setImageResource(R.drawable.ic_baseline_mood_24)

            else ->
                imageView.setImageResource(R.drawable.ic_baseline_mood_bad_24)
        }
        ////////////////////////////////////////////////////////////////////////////////////////

        Toast.makeText(this,"$name"+":"+"$bmi", Toast.LENGTH_SHORT).show()
    }
}
7. 결과화면

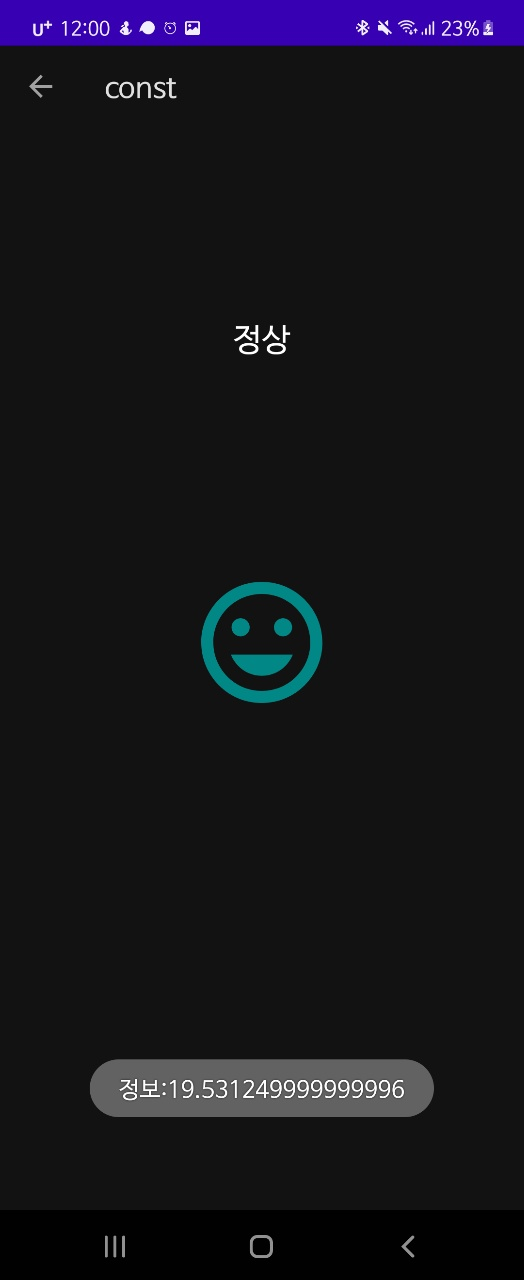
8. 동작 설명
(1) 메인 액티비티에서 이름, 키, 몸무게를 입력한다.
(2) 이 입력한 값들은 getPreferences()를 통해서 데이터베이스 없이 저장 할 수 있다.
이미 한번 입력한 전력이 있다면 어플을 껐다 켜도 edittext부분에 그 전 값이 뜨게 하는 것이다.
(3) 입력을 완료하고 버튼을 누른다.;
(4) 버튼을 누르면 resultActivity로 이동한다.
(5) 버튼을 누를 때 intent를 통해서 입력한 값들이 resultActivity로 전송된다.
(6) resultActivity로 넘어가면 이름과 bmi값이 토스트메시지로 출력된다.
(7) 비만도에 따라서 표정 이미지가 다르게 출력된다.
'개발 > 안드로이드 스터디' 카테고리의 다른 글
| <안드로이드 스터디 06> 색깔 등록, 기본 어플 색깔 설정 바꾸기 (0) | 2022.01.14 |
|---|---|
| <안드로이드 스터디 05> 체크박스 -> 라디오버튼 -> 버튼 -> 선택에 따른 이미지 보여주기 (0) | 2022.01.14 |
| <안드로이드 스터디 04> EditText 입력 후 버튼누르면 그대로 TextView 출력 (0) | 2022.01.07 |
| <안드로이드 스터디 03> 라디오 버튼을 누르면 토스트 띄우기 (0) | 2022.01.06 |
| <안드로이드 스터디 02> 체크박스를 누르면 토스트 띄우기 (0) | 2022.01.06 |
'개발/안드로이드 스터디' Related Articles
more


